Wednesday, October 27, 2010

Naan-Profit?

When I bared the secret of the magical bread recipe a few days ago, I promised to follow with other ideas about how to use the dough. Well, here's the first and the easiest way to use it: make naan, Indian flatbread. While it's not exactly the consistency of the typical naan you buy at an Indian restaurant, it's so fulfilling to have warm flatbread right off the griddle.... "Potatoes, potahtos," I say.

If you already have the French boule dough made and on store (for up to 2 weeks in the refrigerator or as long as you want it the freezer), you can have fresh naan in 6 minutes flat. Pun intended.

AIN'T NAAN LIKE IT


This one got a little crisp, but I kind of like it like that.
THE GOODS

Boule dough (see recipe here)
Butter (about 1/2-1 tablespoon, depending how much naan you want to make)
An appetite

The Grand Total: Next to nothing if you've already made your boule dough. If you haven't, see recipe.


THE WAY


Pull off a handful of dough. I used a piece that was about the size of a large orange. Dust with flour if it's still very wet. Place it on a floured surface and cover it with parchment or wax paper. Roll it out with a rolling pin until it's about 1/4 inch thick.  If you don't have all that stuff, you can just slowly pull it apart by running your hands around the edges in a circle as if it's pizza dough.


Place about 1/2 - 1 tablespoon of butter on a pan over medium-low heat. Put the naan dough on the pan and cover the pan. Let the dough cook for 3 minutes. 


After 3 minutes, flip the naan and cover again. Let it sit for 3 more minutes, then put it on your plate and let the feast begin.

If you're feeling creative, you can also try these other ideas, or create your own:


HER ROYAL EGGSELENCY
After the first 3 minutes, flip the naan and then crack an egg on the second side. Cover and cook as usual.

CHEESE, PLEASE

After the first 3 minutes, place slivers of cheese on the second side, cover and cook as usual. So good.

Monday, October 25, 2010

Fiesta, Fiesta, Siesta, Siesta

It rained all weekend in SF, and I cooped up in my cozy living room with a warm blanket, good company, and my netflix account. This had several consequences: 1) It caused me to watch 4 movies. 2) It made me crave something warm and cozy to eat. 3) It left my hands free and antsy to fidget as I sat around and watched these movies. So... I made tamales.

To be perfectly honest, it was no easy feat. The filling was absolutely delicious before I even folded it up into the husks: it was creamy, sweet, spicy, and warm. I ate a bowlful. It was the folding it up into little bite-sized tamales that took time. But if you have time on your hands, I promise it's worth it. You can make a bunch and then freeze for up to 2 months and microwave them when you're in the mood. I now have a freezer full of 20 or more mini-tamales to warm up whenever a rainy day or a craving strikes.

And honestly, if you don't have that much time, make the corn pudding! It basically tastes like really delicious creamed corn, minus all the cream, plus a little spice. I can taste it now....

I got the recipe from this blog I love, From Argentina with Love. It's fully of adventurous stories and Argentine recipes galore. Try it out, and check out the blog. I'd love to hear your thoughts.

HUMITAS EN CHALA CON QUESO DE CABRA
(CORN PUDDING TAMALES WITH GOAT CHEESE)


THE GOODS

8 ears of fresh corn, in their husks ($4 - on special at Safeway)
1 yellow onion, chopped ($0.40)
4 roasted piquillo peppers, chopped (I used red peppers, for $1)
6 oz. soft goat cheese (I used honey goat cheese because it was cheapest, $3.50)
1/2 cup milk ($1.49)
1 tablespoon butter
1 tablespoon olive oil
1/2 teaspoon crushed red pepper (optional - can leave out if you don't like spice)
Special equipment: cotton string, steamer basket

The Grand Total: $10.39, if it makes 8 servings, that's $1.30 per serving

THE WAY

To Roast your Peppers (I got this part from this thread on CookingLight.com)

Cut the peppers in half and clean out the seeds and innards. Place them on a baking sheet skin side up. Place the sheet in a 450-500 degree oven (you can also use the toaster oven, like I did!) set on broil. The skin will start to blacken and soften in 7-10 minutes. 


Once the skins are brownish-black, remove from the oven and immediately place the peppers in a large ziploc bag. Close and let sit for 20 minutes or so (or until the peppers have time to cool and "sweat"). Once they have cooled you will be able to peel the skins right off. What you will have left is a moist, wonderfully cooked pepper.


For the Corn Pudding

Chop the ends off of the ears of corn (you can use a scissors for the top end, and a heavy knife for the other) so that the leaves are easy to remove.  Carefully remove the leaves of the corn husk and reserve.  Remove and discard the silk.


Using a box grater (an important step--results will not be the same if you cut the kernels off and use a food processor) grate the ears of corn over the large holes on the grater into a bowl.  Slide a knife down the side of each cob to squeeze out any extra starchy juice.


 Meanwhile, combine the butter and olive oil in a medium sized non-reactive pot.  Heat over medium high heat, and add the onion, sauteing until translucent but not brown.  Add in the grated corn and its juices, stirring and heating until thickened, about 5 minutes.  


 Stir in the milk, and heat through.  Continue to stir until milk is absorbed and humitas mixture is thick. The consistency you're going for here is a thickened, pudding-like one.  Add salt, taste for seasoning, and stir in the piquillo peppers and the crushed red pepper.  Remove the humitas from heat, and let cool completely.


When the humitas has cooled (this may also help to thicken the pudding), start your assembly.  Put a large pot fitted with a metal colander or steamer basket on the top (see below) halfway full of water.  Heat the water to a boil.

Cut the string to fit around each tamal. I used about 2 feet per tamal, but you may want to try one out before you cut enough for all of them.

While the water is coming to a boil, assemble the tamales like this:

Place one leaf over another like a cross. Place a dollop of humitas in the middle, and top with a spoonful of goat cheese.
Carefully wrap the inside leaf around the humitas.
Fold the outside leaf around the inside leaf.
Tie up like a present with the cotton string.
When the water begins to boil, place about 6 tamales in the steamer basket and cover with the lid. Keep the water boiling and steam the tamales for 15-20 minutes, until soft and heated through.  Remove the tamales and repeat with the remaining batches.  It may be necessary to add more water and heat to a boil if you run low.


Ta-da!


An Argentine Treat

I grew up with an Argentine best friend, who always had the best after school snacks. Of course, she had the typical frozen bagel bites which she loved to heat up for the gang, but she always followed up the frozen gourmet with a special treat: alfajores, dulce de leche cookies from Argentina.

I had never thought to actually attempt to make them until the urge came over me to do something nice for my roommate, who always raves about the alfajores she ate when she was studying abroad in Argentina. I raked through hundreds of recipes online--apparently alfajores are all the rage on the food blogs these days--until I settled on this one (I trusted it because the alfajores looked like the right combo of soft but still cookie-like and it was a Spanish/English blog called "La Vida en Buenos Aires").

The result was heavenly, and the cookies worked as a highly effective bribe to get several friends to come visit and taste test. Even though it is a little more expensive than my typical recipe, most of the ingredients are things you'll probably have lying around. I would make this recipe a million times over.

ALFAJORES DE DULCE DE LECHE 
(DULCE DE LECHE SHORTBREAD COOKIES)


THE GOODS

1/4 pound butter (1 stick) at room temperature ($1.49 or less for 2 sticks)
4 egg yolks, lightly beaten ($1.29 for a dozen)
1 teaspoon vanilla ($4.79 for a large bottle - could be free if you have it)
1 teaspoon lemon or lime zest ($0.20)
1 cup corn starch ($1.30)
1/2 teaspoon baking soda ($1.55)
1 teaspoon baking powder ($1.39)
1 can of sweetened condensed milk ($1.09) - or a can of dulce de leche if you don't want to make it
1/8 teaspoon salt
1/2 cup sugar
2 cups flour
Powdered sugar or grated coconut for dusting
Parchment paper or a nonstick baking sheet
*Optional:  2 tablespoon brandy or cognac (I didn't use it and they still turned out delicious)

The Grand Total: $13.10

THE WAY
*If you're making your own dulce de leche, start preparing it at least 3 hours in advance.

Dulce de Leche
Remove the label from your can of sweetened condensed milk. Place it in a large pot and pour in water until the can (still closed) is submerged. Remove the can. Place the pot of water on the stove over high heat until the water is boiling. When it starts to boil, carefully place in your can of milk and reduce the heat to a simmer. Cover the pot to reduce water evaporation. Simmer for 3-4 hours, refilling the water if it evaporates.


Then, remove the can and let it cool before you use it for the cookies.

If you're afraid of heating a sealed can, here's the "safe recipe" according to La Vida en Buenos Aires: Pour 1 can sweetened condensed milk into 9-inch pie plate. Cover with aluminum foil; place in larger shallow pan. Fill larger pan with hot water. Bake at 425 degrees F for 1 hour or until thick and caramel-colored. Beat until smooth.


 Cookies

Beat butter and sugar until fluffy and creamy. Add the egg yolks one by one. Add vanilla and brandy and mix well. Combine flour, cornstarch, salt, baking soda and baking powder in a bowl. Add the flour mix over the butter mix and work with your hands until the dough became soft. Do not add extra flour.

Wrap in saran wrap and chill for 2 hours.


Check out the strong hands using my makeshift rolling pin...
Go Bears!
(*Note: when I did this step, the dough was rock hard and crumbly and I was very worried about how the cookies would turn out. So I wet the dough with water to help it roll out easier. It worked and the cookies turned out perfect, so have no fear!) After the 2 hours, preheat the oven to 325 degrees Fahrenheit. On a floured work surface, roll out dough to a thickness of 1/4 inch.


Cut into 2-inch rounds (I used a shot glass as a cookie cutter to make lil mini cookies) and transfer to a baking sheet lined with parchment paper. 


Bake for 15 minutes or until done. 

The cookies will be dry but not brown. When the cookies are cool, spread a spoonful of dulce de leche on one cookie and top it with another. Press together gently; dust with powdered sugar (as I did) or roll the seam of the alfajor in grated coconut. You can also dunk the whole thing in chocolate if you're feeling naughty.

Like eating a South American cloud....

Friday, October 22, 2010

Creamy Comfort

My latest foray into Trader Joe's had me walking out with a giant butternut squash in hand. Now what? Well, there's always the option of making lovely and delightful fall decorations, but my stomach wanted it more than my centerpiece. So the only logical thing to do was to make risotto. And as I reflect upon this experience, all I can say is this: I did it once, and I'd do it again.
 
BUTTERNUT SQUASH RISOTTO
*I used this recipe from simplyrecipes.com and came up with this masterpiece, which I have been eating  as (warm lunch) leftovers throughout the week.


THE GOODS


6-8 cups chicken broth, or vegetable broth for vegetarians (I use chicken buillon, for mere pennies)
4 tbsp unsalted butter ($3.29)
1 small onion, finely chopped ($0.40)
Butternut squash, peeled, and finely diced ($1.59)
2 cups arborio rice--can substitute medium grained white rice, but arborio is preferred ($2.29)
1 cup dry white wine (I used Charles Shaw for $1.99)
1 cup freshly grated Parmesan cheese ($2.69)
Sage (optional: this is what I used because I had some, but the recipe I referred to recommends chives)
Salt

The Grand Total: $12.25 for at least 6 servings, depending on how big your butternut squash is (the recipe feeds 4-6 and calls for 2 cups of squash, I had at least twice that). That's $2.04 per serving.

THE WAY 

Heat broth in medium sized saucepan and keep warm over low heat. Melt 3 Tbsp of butter in a large saucepan; add onion and butternut squash. Cook over medium heat until onion is translucent, about 5 minutes.

Add rice to onion and squash. Cook 1-2 minutes. Add wine. Cook, stirring constantly until rice absorbs wine. Add a few ladles of broth, just enough to barely cover rice. Cook over medium heat until broth has been absorbed. Continue cooking and stirring rice, adding a little bit of broth at a time, cooking and stirring until it is absorbed, until the rice is tender, but still firm to the bite, about 15 to 20 minutes.


During the last minutes of cooking, add remaining tablespoon of butter, 1/3 cup Parmesan, and sage. At this point the rice should have a creamy consistency. Add salt to taste. Serve with remaining grated Parmesan.

Wednesday, October 20, 2010

The Secret to Becoming Fat and Rich

First of all, props you for continuing to read this blog post after seeing that title. Either a) you're not afraid of standing out from the crowd or b) curiosity got the blog reader. Whether you're type A or type B, you will not regret your perseverance. Because at this point, I will share with you the best and cheapest recipe I have learned since I started this blog: the recipe for how to bake fresh artisan bread.

When I say it's the recipe for how to bake bread, I mean it's the recipe for how to make bread that several guinea pigs agreed--even after blind testing--tastes better than the bread at the bakery across the street from my apartment... the recipe for how to make bread that comes out of the oven steaming hot and can be served with olive oil... the recipe for how to make bread that can be transformed from French boule (boule means ball in French), to pecan encrusted cinnamon buns, to caramelized onion dinner rolls, to pizza crust or naan. Honestly, it's magic. And I'm imparting it on you... now.

NO-KNEAD BREAD THAT'LL KNOCK YOUR SOCKS OFF
I promise it's easy! Check out the recipe from "Mother Earth News" where I learned how to do this sorcery and learn how to use the recipe to make other types of bread.


THE GOODS

1.5 packets (1.5 tablespoons) of yeast ($3.38)
6.5 cups unsifted, unbleached, all-purpose white flour ($1.99)
1.5 tablespoons salt (the recipe calls for Kosher or sea salt, but I used table salt)
3 cups lukewarm water

The Grand Total:  $5.37 for at least 4 loaves of French boule (the dough can be refrigerated or frozen and baked at any time). To put that more concretely, it took 4 people with big appetites to finish off the 1 loaf you see above. Multiply that by 4 loaves and you have 16 servings at $0.34 per serving!


THE WAY

Mixing and Storing the Dough 

*It is best to do this at least 3 hours before you actually want to bake the bread, but you actually can do it up to 2 weeks in advance and store in the fridge (or as long as you want in advance and store in the freezer).

Heat the water to just a little warmer than body temperature (about 100 degrees Fahrenheit). Add yeast and salt to the water in a 5-quart bowl or, preferably, in a resealable, lidded container (not airtight — use container with gasket or lift a corner). Don’t worry about getting it all to dissolve.

Mix in the flour by gently scooping it up, then leveling the top of the measuring cup with a knife; don’t pat down. Mix with a wooden spoon, a high-capacity food processor with dough attachment, or a heavy-duty stand mixer with dough hook, until uniformly moist.


If hand-mixing becomes too difficult, use very wet hands to press it together. Don’t knead! This step is done in a matter of minutes, and yields a wet dough loose enough to conform to the container.


Cover loosely. Do not use screw-topped jars, which could explode from trapped gases. Allow the mixture to rise at room temperature until it begins to collapse (or at least flatten on top), approximately two hours, depending on temperature. Longer rising times, up to about five hours, will not harm the result. You can use a portion of the dough any time after this period. Refrigerated wet dough is less sticky and easier to work with than room-temperature dough. We recommend refrigerating the dough at least three hours before shaping a loaf. And relax! You don’t need to monitor doubling or tripling of volume as in traditional recipes.


On Baking Day

While the recipe recommends using a pizza peel (a long-handled board that helps slide doughs onto a hot stone for cooking), I used a metal casserole dish. Sprinkle whatever you use liberally with flour (or cornmeal, as the recipe recommends) to prevent it from sticking.

Sprinkle the surface of the dough with flour, then cut off a 1-pound (grapefruit-sized) piece with a serrated knife. Hold the mass of dough in your hands and add a little more flour as needed so it won’t stick to your hands. Gently stretch the surface of the dough around to the bottom so that it gets a little wider. Most of the dusting flour will fall off; it doesn’t need to be incorporated

Place the ball on the pizza peel or metal pan. Let it rest uncovered for about 40 minutes. Depending on the dough’s age, you may see little rise during this period; more rising will occur during baking.

Twenty minutes before baking, preheat oven to 450 degrees with a baking stone on the middle rack (I didn't do this, but just used the metal dish I placed the dough on originally). Place an empty broiler tray (or another metal pan) for holding water on another shelf.

Dust the top of the loaf liberally with flour, which will allow the slashing, serrated knife to pass without sticking. Slash a 1⁄4-inch-deep cross, scallop or tick-tack-toe pattern into the top. This helps the bread expand during baking.

With a forward jerking motion of the wrist, slide the loaf off the pizza peel and onto the baking stone. Quickly but carefully pour about a cup of hot water into the broiler tray and close the oven door to trap the steam. Bake for about 30 minutes, or until the crust is browned and firm to the touch. With wet dough, there’s little risk of drying out the interior, despite the dark crust. When you remove the loaf from the oven, it will audibly crackle, or “sing,” when initially exposed to room temperature air. Allow to cool completely, preferably on a wire rack, for best flavor, texture and slicing. The perfect crust may initially soften, but will firm up again when cooled.

Refrigerate the remaining dough in your lidded (not airtight) container and use it over the next two weeks: You’ll find that even one day’s storage improves the flavor and texture of your bread. This maturation continues over the two-week period. Cut off and shape loaves as you need them. The dough can also be frozen in 1-pound portions in an airtight container and defrosted overnight in the refrigerator prior to baking day.

Pumkin Season in Session

My soup binge of late led me to the canned vegetable aisle, where I stumbled upon something that made me very happy: pumpkin. Fall is my favorite culinary season because it means pumpkin, butternut squash, cranberry, and gingerbread. Although I wasn't mentally prepared to make pumpkin pie, I decided to get crazy and make pumpkin soup.

I didn't have red Thai curry paste on hand to follow this recipe from 101 Cookbooks to a tee and I also used canned rather than normal pumpkin, so the result was a very smooth, very mild (but warm) dinner + 2 lunches. Although the soup was tasty--and even better the second day--it was a little too mild for my liking. I think the red Thai curry paste would be the perfect addition, so I'd love to hear how it is if someone else tries it.


THAI PUMPKIN SOUP


THE GOODS

1 can of pumpkin ($1.99)
1 can of coconut milk ($0.99)
Some red pepper flakes and a red pepper (but I would sub this for red curry paste next time) 
Salt and pepper
Basil (from my plant)

Notes: I also added a couple tablespoons of chicken bouillon, but I don't think you'd necessarily have to do that if you have the kick from the curry. Also, the recipe I worked from recommended topping with pumpkin seeds, which I think would be delicious....

The Grand Total:  $2.98, or about $0.99 per serving (cheapest recipe yet?)

THE WAY

(What I did, but I recommend you use curry paste instead: slice hot pepper and sautee in olive oil over medium heat in a large pot for 2-3 minutes.) Plop the pumpkin into a large pot over medium high heat. Add the coconut milk and curry paste and bring to a simmer. Bring up to a simmer again and add the salt and basil (and more curry paste if you like, the recipe recommends 6 teaspoons).

Serve with a garlic crostini (or a piece of toasty bread).

Thursday, October 14, 2010

Spice Up Your Lunch Break

Sometimes I get sick of the same old sandwiches, which is why I decided to go for the dive and try something different. This week, instead of buying my typical feta and cheddar cheeses, I ventured out of my comfort zone and into some gruyere. The result? A spinach, carmelized onion, and gruyere sandwich with dijon mustard. Let's just say I was very happy when noon rolled around.


GRUYERE, CARAMELIZED ONION, CUCUMBER AND SPINACH SANDWICH
 

THE GOODS

Spinach ($1.99)
Dijon mustard ($2.39)
Gruyere cheese ($3.49) - would be good with other types too
Cucumber ($0.50)
Red Onion ($0.40)
Bread
Balsamic Vinegar

The Grand Total: $8.77

THE WAY

Carmelize your onions (find out how here). Toast your bread. Spread on some dijon mustard, layer on slices of cheese, cucumber, and spinach. Wrap that baby up with tinfoil and stick it in your briefcase/purse/backpack.

Wednesday, October 13, 2010

Lean and Green

Last night, I faced one of those decisive moments where I realized I had just about nothing left in my refrigerator. So I took the only logical next step: I moved on to racking through the reliable old freezer.... Well, frozen green beans it was. But I made up my mind not to have bland old steamed veggies. So I combined a few recipes, grated in some gruyere, and ate a casserole dish full of delicious roasted green beans, red onions, and almonds. Now, you can too.

GARLIC ROASTED GREEN BEANS W/ GRUYERE & ALMONDS

*I used this recipe from Kalyn's Kitchen as a basis.


THE GOODS 

1 lb. frozen green beans ($1.99)
1 red onion shallots, sliced and taken apart ($0.40)
5 large cloves garlic, peeled and cut into thin slices ($0.40)

1/4 cup almonds, chopped ($0.99)
1 tsp. lemon zest
($0.29)
3 tbsp grated Gruyere, optional ($3.49)
2 T olive oil
1 tsp. salt (or less)
fresh ground black pepper


The Grand Total: $7.56

THE WAY

Preheat oven to 450 F. Peel and cut red onion and garlic, then place with beans in casserole dish Add olive oil, salt, and pepper, and toss until well coated with oil.
Arrange the vegetables in a single layer on the dish. Sprinkle grated Gruyere on top. Roast 12-15 minutes for thin beans, or slightly longer for regular beans, until beans are slightly shriveled, and onions and garlic are lightly browned.

While beans cook, toss together chopped almonds and lemon zest. When beans are done, toss hot beans with lemon/almond mixture and serve immediately.

Tuesday, October 12, 2010

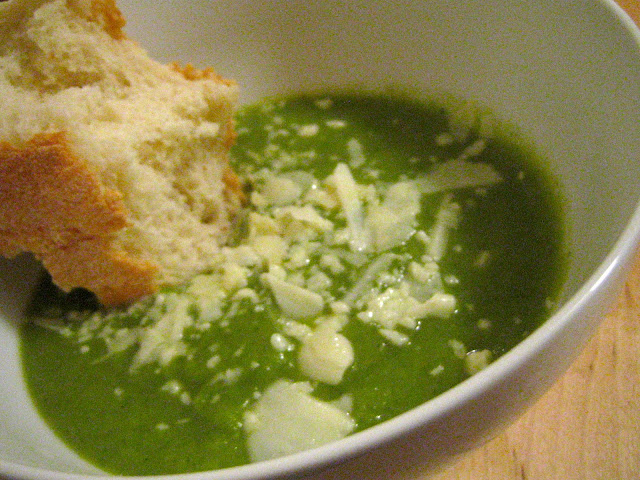
Flubber?

No, it's not. Actually it's cream of broccoli soup, minus the cream. A new recipe book that I just bought for $1 at the Fort Mason Book Fair is revealing all sorts of secrets and delights to me, which I have decided to begin to hare with you. The first item on the agenda is "Minestra con Broccoli," an Italian recipe. As per usual, I cut the amount of butter that the recipe calls for in half, so if you feel like indulging and doubling the butter from my recipe, go right ahead.

MINESTRA CON BROCCOLI (BROCCOLI SOUP)


THE GOODS

*You need a blender or a fine sieve for this recipe.


For 3 servings-
1.5 tablespoons butter ($1.99)
1 clove garlic, cut in half ($0. 20)
1 package frozen chopped broccoli ($1.99)
1 tablespoon tomato paste - I substituted with diced canned tomatoes ($0.80)
3 tablespoons chicken broth powder (or 2 chicken buillon cubes) ($1.99)
3 cups hot water
1/4 teaspoon salt
Dash black pepper
Crusty french bread, or whatever you have

The Grand Total: $6.97

THE WAY

Melt butter in a large saucepan over medium heat. Brown garlic in butter, remove. Add broccoli; cook just until heated. Add water, buillon cubes, tomatoes, salt and pepper. Cook 5-10 minutes. Force through fine sieve or blend smooth in blender. Cook over medium heat, stirring occasionally until heated, about 10-15 minutes. Serve with crusty bread or croutons.